
Are you a seasoned person of Linux, probably Dedicated Servers or Virtual Private Servers? If sure, then I’m certain the safety of your net hosting is a problem that you cannot take lightly.
Viruses, worms and other malicious entities are usually evolving to conquer the contemporary defenses that machine architects and protection businesses can devise. Hence, it is a good exercise to be prepared and ClamAV antivirus is the fine preference, with it being to be had on our cPanel Servers.
What is ClamAV?
ClamAV is an open source antivirus software program used as an internet and mail scanner protecting the laptop from malicious viruses imparting security. It helps multiple file codecs, signature languages and also consists of a multi-threaded scanner daemon. ClamAV is a cross-platform antivirus software program assisting running structures like Windows, Linux, BSD, Solaris and Mac OS X.
Features of ClamAV
Some of the capabilities of ClamAV encompass the subsequent:
- It is a command line scanner with superior gear
- Is able to stumble on over 1 million viruses, trojans, worms, mobile malware amongst others.
- Has integrated help for almost all mail document codecs
- Supports special document formats like HTML, RTF, PDF, TNEF and others
Has a complicated database updater helping scripted updates, digital signatures and DNS based database model queries - Scans inside documents and compressed files and helps report formats like ZIP, RAR, 7Zip, ARJ, Tar, CPIO, Gzip, Bzip2, DMG, IMG and others
How to install ClamAV on Linux?
Now that we’ve seen the functions of ClamAV, allow us to see the way to installation ClamAV on Linux. For your advantage, we’ll be installing ClamAV on Linux Server as well as a standalone personal pc.
Part I:
We are going to put in ClamAV on Linux cPanel in WHM with full root get right of entry to
Step I: Login to your WHM panel as a root user

Step II: Now Click at the cPanel icon and pick Manage Plugins.

Step III: Select ClamAV and click on on ‘Install ClamAV’

Step IV: Your server is now secured with the state-of-the-art updated ClamAV anti-virus.

Part II:
For installing ClamAV on a standalone PC with Linux Operating System comply with the under steps.
Step 1: Open the terminal and sort in the following command. This command installs ClamAV and clamscam, the command-line scanner.
sudo apt-get deploy clamav

Step 2: Since ClamAV is a command line tool, strolling it is able to be a trouble. For that functions, putting in a GUI device is a better choice. ClamTk is a GUI front-give up device for ClamAV the use of perl-Gtk2. It may be discovered within the Software Center or can be mounted manually. Below is the command for manual installation.
sudo apt-get deploy clamtk

How to use ClamAV?
Once you’ve set up ClamAV on Linux, it’s time to apply it. There are a few commands that may be run in clamscan. For instance,
-h, -help: This is for printing assist information and exit.
ResellerBytes shared web hosting products come with ClamAV pre-mounted so you get the excellent in magnificence safety from viruses and other threats. If you have got purchased servers with root get entry to, you could setup ClamAV as special above and experience sturdy safety with your web hosting.
As a website owner, the security of your website is of utmost importance. An SSL (Secure Socket Layer) Certificate ensures and authenticates a website by encrypting the data within your website’s network basically your computer and the end destination server.
OpenSSL is a powerful toolkit for Secure Socket Layer (SSL) and Transport Layer Security (TLS) and licensed under an Apache-style license. SSL widely known as Secure Socket Layer is the security protocol that encrypts the links between your web server and browser, securing it. To create the SSL connection your web servers needs an activated SSL certificate. and, you can easily install it. Typically once you activate your SSL certificate, ‘HTTP’ changes to ‘HTTPS’ in the URL, securing your website.
![]()
The process for installing SSL on your cPanel varies slightly with different hosting products, the steps with Shared Hosting might not necessarily be same with Cloud.
In this post, I’ll be covering how you can enable SSL on your cPanel using WHM.
Installation
To install SSL on your cPanel when you have root access to your server (Dedicated Hosting and VPS Hosting) you need to follow the following steps,
1. Login to your WHM root account and select SSL/TLS which is available to the cPanel users

2. Next step would be to generate the SSL Certificate, private key and CSR (Certificate Signing Requests), the Private Key is set to 2048 bits as it is the recommended size.


3. Once the certificate is generated, a copy of it will be sent to you via email too. To activate the certificate you need to install it. You can either paste the certificate or browse it and upload it automatically.


4. Reload your website to check if the certificate is installed. If it is, you’ll see https instead of http in your url.


Conclusion:
Enabling SSL on cPanel using WHM full root access is a simple process and enabling it assures your customers that both your website and business are secure as well as genuine.
cPanel is a prevalent dashboard to oversee facilitating orders be that as it may, in case you’re not very clear on the best way to utilize cPanel, this article will walk you through the essential capacities that you can perform with applicable screenshots.
What is cPanel?
CPanel is a dashboard to manipulate your internet hosting account thru a web interface. CPanel makes managing a hosting account smooth that even those without technical expertise can installation websites. The cPanel dashboard additionally gives you updates, the capability to get right of entry to and manipulate add-on domain names, FTP, security measures, enable backup to your files & extra. We at ResellerBytes also provide easy control with cPanel for a gaggle of our products, namely:
Products you can access through the cPanel include:
- Security
- Domains
- 3rd party app software
- Files
- Databases
- Logs
Several of these gear can be available at the discretion of your server administrator or net host as they will want additional modules or gear to be set up and uncovered within the cPanel interface. The cutting-edge version (as of publishing this article) is cPanel & WHM model sixty-six, released on twenty-fourth July 2017. Here are extra facts on the release.
Why do people use cPanel?
- As mentioned earlier, it’s easy to use
- Helps set-up & manage email accounts & services
- Helps manage domains
- Allows easy website backup
- Helps keep a tab on your bandwidth usage
- Upload & manage files
How to use cPanel?
In this section, we will be addressing the following how-to’s on cPanel:
- How to Update contact information
- How to change your password
- How to manage domains
- How to edit/ remove domains
- How to set up an email account
- How to manage your files
- How to backup your website
If you’re new to cPanel & have never logged in before, your hosting provider would have given you a username and password. You can login to your cPanel by typing in your domain name followed by a 2082 or 2083. Example: www.example.com:2082 or www.example.com:2082. You will be required to fill in your username & password here.
This is a typical view of your cPanel dashboard:

On the top, right-hand side of your panel, you will be able to see your Username with a drop-down of settings where you can change your password, your language, style etc. It can all be reset with a single click.

You will then be able to see the sidebar which will contain:
- Home
- Statistics like file transfers, email account number, domain names etc.
- Dashboard for commonly used links, overview of bandwidth & disk space
- User management to add/ remove users email accounts, manage who has access to FTP etc.

Let’s now address the ‘how-to’s’.
How to update Contact Information in cPanel
To update your contact information, click on the drop-down next to your username on the top right-hand side.
Click ‘Contact Information’
You will see a screen like this:
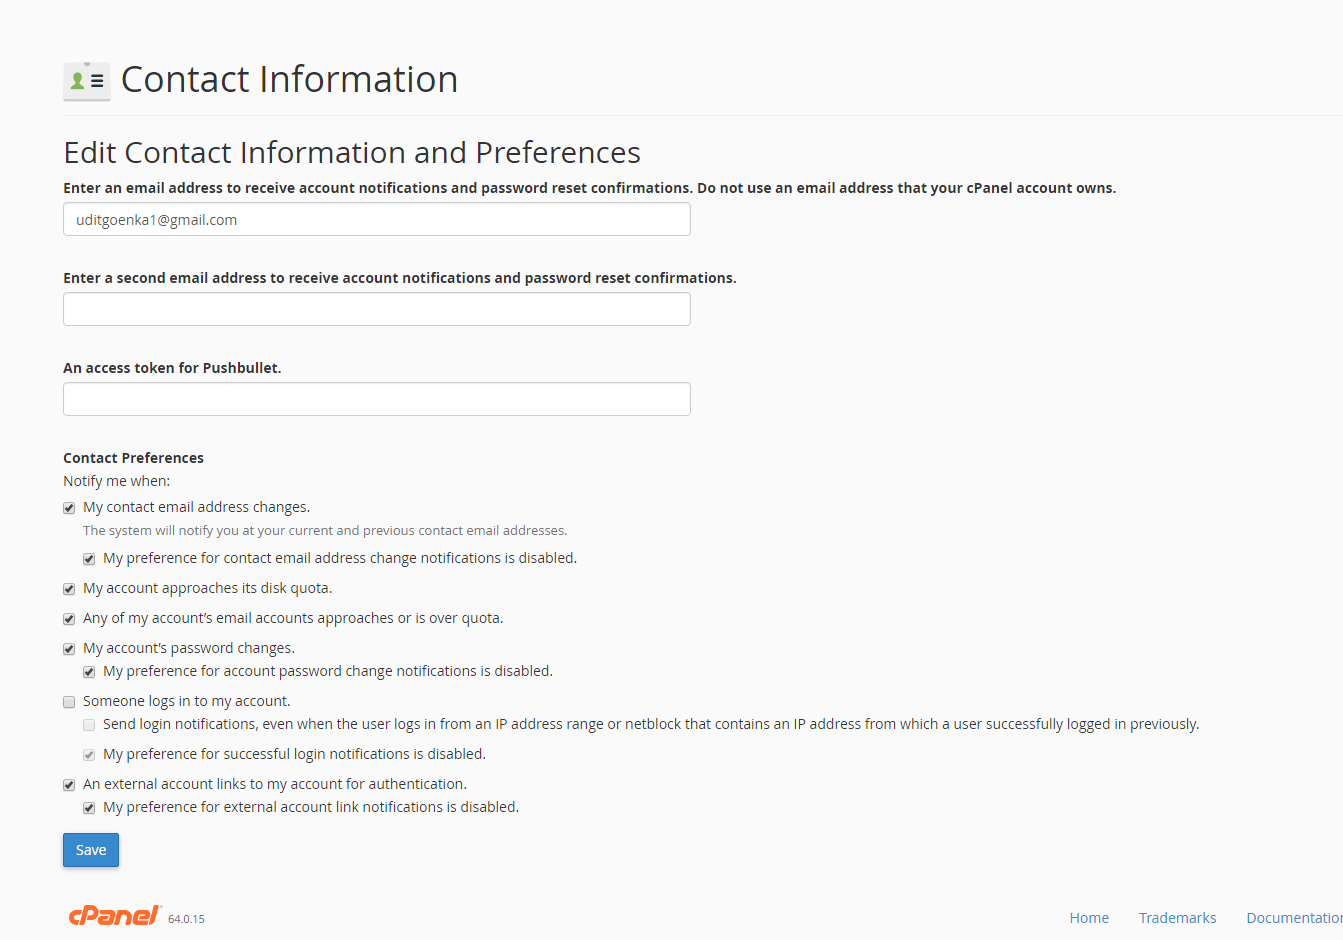
Leave all the boxes ticked to get notified about any account information changes, low disk space changes etc.
How to change password in cPanel
Change your password easily by heading to Password & Security. Here, you will need to enter your old password before you can change it to the new one.
Choose a strong password.

How to manage Domains in cPanel
cPanel allows you to host multiple domain names within the same panel. If you need to add/ remove a domain name from your cPanel, here’s how to do it.
Adding a Domain Name
Under the Domains section, click Addon Domains if you want to add a new, fully functioning website.

- The New Domain Name is the name you’ve registered sans the ‘www’.
- The Subdomain is automatically created
- The Document Root is the location of your new domain’s files on the server
Once you fill in the first field, the other two are auto-populated.
Hit Add Domain & you’re done.
How to Edit / Remove Domains in cPanel
On the Addon Domain screen, hit the Modify Addon Domain section where you can:
- Edit the document root
- Manage redirections
- Remove the domain altogether

How to set up an email account in cPanel
If you want to add an email account, simply click Email Accounts. You’ll see this screen:

- To set up an account, type in the contact email address (yourname@example.com)
- Next, type in the domain name (you’ll need to have it added to cPanel before you do this step)
- Create a strong password
- Add a mailbox quota
- And click Create Account
To access your webmail account, simply type http://mydomain.com/webmail in the address bar.
How to manage your files in cPanel
Files is where you can upload files, take backups of your website & manage FTP accounts. Be very careful that you don’t modify or delete files accidentally, though. Here, you will see root files and subfolders.

Once here, you can create a new folder, you can upload a file through File Manager.
How to backup your website in cPanel
Backup Wizard in Files makes backing up a really simple task.

Once here, click Backup to backup your files. You will be given the option to either fully back up all files or do a partial backup which includes Home Directory, MySQL Databases, Email Forwarders & Filters.

You can choose your backup destination & request an email notification once the backup is complete.
Conclusion
We hope we were able to help you work your way around the commonly used features of cPanel with this How to use cPanel guide. If you’d like more tutorials on more functions, leave us a comment below & we’ll do a Part II of this post.
Migrating Sites or Web Hosting Packages to a new provider can be a daunting task. Over the years, we’ve seen countless instances of clients sticking with their hosts despite constant difficulties and we’ve come to understand the worry that migration brings.
However, it doesn’t have to be that difficult! To help Customers/Resellers ease their migration worries, we’ve recently launched a free, 3-step Migration Process to migrate websites from other hosts using cPanel. In this post, we’ll explore a little about the difficulties faced with cPanel Migration and how to migrate your hosting to ResellerBytes!
CPanel Migration – What to look out for:
While the cPanel migration process is pretty straightforward, there are certain pain points in this process. For instance:
- In the case of Reseller Hosting packages, without the WHM backup option the migration process is tedious with users having to backup & restore each account separately. Having the WHM backup option enabled solves this problem but a majority of hosts don’t provide this option in order to minimize server load.
- When migrating Shared Hosting packages another issue users face is while they can generate a full website backup they would have to restore various sections of their site separately.
- Also, the entire process is time consuming especially for users with a large number of packages or accounts.
With our migration process, we’ve tried to eliminate these issues and offer a seamless experience to users.
How to migrate your Hosting packages to us:
If you’re looking at migrating your Hosting packages to us, there’s absolutely nothing you need to do!
After considering the feedback of a number of our Hosting Resellers, we’ve created an easy, 3 step migration process that is handled completely by us. All you have to do is contact us and we’ll get in touch with you for more details. Our Hosting specialists will then migrate your Hosting packages over to ResellerBytes.

Here’s what our migration process includes:
- Complete Content Migration i.e. all site files, databases & emails
- Domain Transfer assistance
- Assistance with DNS Modifications
- Constant updates from your dedicated Account Manager
- Complete Migration in 24-48 hours (subject to number of accounts as well as size of each account)
There are a few terms and conditions that you’ll have to keep in mind before you migrate your packages to us. These include:
- We’ll only be able to complete cPanel to cPanel migration requests.
- For Reseller Hosting, we will only be able to migrate packages with a maximum of 30 Accounts under it. However, there is no limit on the number of packages that can be migrated.
- Packages with more than 30 Accounts will be charged based on the number of accounts that need to be migrated.
- cPanel Accounts with data above 4 GB will not be migrated.
- If you’re looking at migrating into our Multi-Domain Shared Hosting packages, all add-on Domains should belong to one Customer only.
That’s everything you need to know about migrating your hosting over to ResellerBytes! We’re already seeing a phenomenal response for this service and I hope you make the most of it as well.
If you’d like to try out our Migration service, all you need to do is click on the button below, fill in your details and leave the rest to us!
If you’ve already tried our new migration process, we’d love your feedback! Do let us know what you liked (and didn’t) in the comments below.
Happy Hosting!
Have a cPanel account but not sure how to go about setting up Webmail to look professional? Fret not! In this article, we explain what exactly webmail is, why it is important and take you through a step-by-step guide on how you can set up webmail accounts from cPanel. Read on!
What is Webmail?
Webmail is nothing but an e-mail client as a web application on a web server. The main advantage of webmail over the conventional desktop email client is the accessibility from any web browser, anywhere. Outlook, Gmail, Yahoo are all examples of webmail providers however they are not to be confused with webmail software. Examples of webmail software are Horde, Roundcube and SquirrelMail.
Webmail allows you direct access to emails from your provider’s server through an interface accessible from a URL. Other forms of accessing emails on a server include protocols such as POP3 and IMAP which can be used to sync the contents of the email with another device or locally saved folder on a mobile phone or laptop. Webmail enables you to send and receive emails from anywhere and any device, provided you have an internet connection and a web browser.
Why webmail?
Some fantastic advantages of using webmail are that it’s:
- Portable and accessible from anywhere
- Useful in that it helps you stay connected to avoid missing or delaying a response to an e-mail
- Easy and requires almost no set-up
- Especially helpful if you can’t install a software on a work/ school computer system
- Helpful to save space on your device since the emails are stored online
How to set up Webmail Accounts in cPanel
Webmail is a feature provided through cPanel (a Linux based web hosting control panel). Here’s how you can set up email accounts in cPanel:
Step 1: Login to your cPanel
Step 2: Once you’re logged in, scroll to the Mail section & hit Email accounts
Step 3: Once directed to a page, choose a domain from the dropdown on the RHS where you want to create your email address, fill in the fields with information such as Email, Password, Confirm Password etc.
Step 4: After filling all required fields, hit Create Account & you’re done!
Step 5: You can access your email by scrolling down till you can locate the name of your new account, clicking on More which will display the option to Assess Webmail
Step 6: Here’s where you choose the webmail software – SquirrelMail, Horde or Roundcube which will take you to your inbox.
The video tutorial for the same is below.
How do I login to Webmail?
There are a couple of ways your client can login to his webmail.
- Through the cPanel interface: To login through his cPanel dashboard, he will need to make his way to Home > Email > Email Accounts. Under the More menu next to the email account name, go to Access Webmail.
- Through a direct link: Assuming his domain is www.test.com and he wants to access user@test.com, he will need to visit test.com/webmail, enter his username and password and click OK. That’s it!
- Through the default webmail port 2095: He just needs to use www.test.com:2095
- Through one of the three webmail clients through direct URL: By accessing Horde, SquirrelMail or Roundcube through their direct URLs, your client can access his emails. He will need to replace test.com with his primary domain and enter one of the following URLs:
Horde: https://www.test.com:2096/horde/index.php
SquirrelMail: https://www.test.com:2096/3rdparty/squirrelmail/index.php
RoundCube: https://www.test.com:2096/3rdparty/roundcube/index.php
SquirrelMail, Horde, or Roundcube: Which to choose?
It can be confusing when you’re presented with 3 options to login to your webmail from. SquirrelMail, Horde, and Roundcube all allow access to emails but have their own features and look.
The 3 available Webmail Clients
Horde: Has more features than SquirrelMail however it can slow down the software.
SquirrelMail: Though limited in its features, this software allows you to read & respond to emails quickly.
Roundcube: Latest addition to cPanel. Is middle ground between SquirrelMail & Horde. Look and feel is neat.
We hope this article on How to Set up Webmail on your Hosting Package was useful and you can pass this onto your client. If you’ve got queries regarding webmail set up, please let us know in the comments section below.